Showing posts with label Howto. Show all posts

Friday, June 10, 2016

How to upgrade your i-FlashDeviceHD Flash Drive

written by althemax.com

: www.althemax.com

How to upgrade your i-FlashDeviceHD Flash Drive


Introductions
● Please directly inserted into the computer, don't use ‘USB
Extension Cable USB’ or ‘USB HUB’
● Computer hardware environment(电脑硬件环境)
CPU: More than 2.0G
Memory: More than 1GB
Hard disk: 80G
Support system: Windows 2k/xp/vista/7 and 32bit
Operating steps

1.Open the software(打开软件)
1> Right Click and Open as admin (双击如下图标)
A Tool - firmware upgrade for i-flash device
2> Software interface(软件界面)
A Tool software interference - iflash device upgrade
2.Insert ‘Flash Drive’ to PC and Select Tool (插入 盘并选择工具)
1> Correct, next step(工具选择正确,进行下一步操作) ;
A Tool software interference - iflash device upgrade
2> According to the prompt replacement tool and Start operation, pull out flash drive, back to step 1(根据提示更换工具,拔出 盘,回到第一步重新开始操作) ;
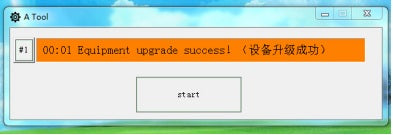
3.If the device has already, Click “start” (如果设备已就绪,点击“ start” )
1> Complete upgrade, pull out flash drive(完成升级,拔出 盘);
A Tool software interference - iflash device upgrade
2> Update failed, Start operation, pull out flash drive, back to step1(升级失败,拔出 U盘,回到第一步重新开始操作);
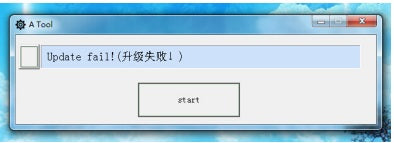
A Tool software interference - iflash device upgrade
3> If there are other anomalies, pull out flash drive, back to step1(如果出现其他异常情况,
拔出 盘,回到第一步重新开始操作);

4.If update success.Please Off the tools,let ‘flash drive’ run in PC twice,To
ensure that the upgrade is complete!(升级成功后,请关掉升级软件在 PC 上运
行两次,以确保升级完成!

Q&A:
Q: Insert the computer, prompted ‘unknown file’ or ‘virus’?
插入电脑后,出现提示不明文件或者是病毒?
A: Close the firewall (such as anti-virus software).关闭防火墙(杀毒软件等软件)
Q: Open the wrong or can't open?(打开出错或者无法打开?)
A: The identity of the need to use the administrator to open the tool.(需要用管理员的身份打开工具。)
Q: Click "start" no response?多次单击‘ start’无反应?
A: Pull out ‘FlashDrive’ and close the tool, back to step1;Or, insert another USB interface;Or, In another computer. 拔出 盘并关闭工具,回到第一步重新操作;或者换另外一个 USB 接口再操作;或者更换一台电脑再操作
Q:‘ Update fail(升级失败)!’?
A: Pull out ‘FlashDrive’ and close the tool, back to step1;Or, insert another USB interface;Or, In another computer.
拔出 盘并关闭工具,回到第一步重新操作;或者换另外一个 USB 接口再操作;或者更换一台电脑再操作
Q: repeated 'Update fail and fail (upgrade)!'?反复出现‘ Update fail(升级失败)!’?
A: Pull out ‘FlashDrive’ and close the tool, back to step1;Or, insert another USB interface;Or, In another computer.
拔出 盘并关闭工具,回到第一步重新操作;或者换另外一个 USB 接口再操作;或者更换一台电脑再操作

Saturday, August 22, 2015

64GB USB i-Flash Drive U Disk 8 pin Memory Stick Adapter For iPhone 5 5S 6 plus


64GB USB i-Flash Drive U Disk 8 pin Memory Stick Adapter For iPhone 5 5S 6 plus

http://www.althemax.com/products/4350G64 


  • DESCRIPTION
Overview :
Newest design mobile phone USB flash drive, it can be connect to iPhone5/5s/5C/6/6 plus, iPad4/5/mini and iPod touch 5 as a memory expansion. It is very convenient to convert the data between them. With dual interface both USB 2.0 & iphone 8-PIN port, support plug and play. Compatible with new model of iPhone, iPad, iPod and so on. When you plug it, it will automatic prompt to freely download “ i-FlashDrive” from App store. It build-in a smart IC to supports to recognise and upgrade by itself to insure long-term stable running. No need to synchronize with iTunes to transfer between the usb flash drive and iPhone / iPad / iPod. Your can backup the contact info from iPhone / iPad, and restore the data for them.


Features:
- Support most of the file format, also freely transfer between iPhone/iPad and PC. Independent broadcast program and support to play the music under desktop background.
- Music-streaming, directly paly music and do not occupy any space of iPhone / iPad.
- Separate connection to PC, become the normal usb flash drive.
- Can apply to windows and linux system.
- System Compatible with iPhone 5 / 5S / 5C / 6, iPad 4 / Air / Mini / Mini 2( The standard USB is compatible with all USB based computers and OTG enabled Android phones. And at the other end it works with iPod touch, iPhone an iPad.) 


Package Include:
- 64GB USB i-Flash Drive Adapter X1

Tuesday, August 18, 2015

How to Sync Wii Remote with Wii / Wii Mini Console

written by althemax.com

Related Products: Wii Remotes, Wii Remote Plus 

Applies to:  Wii, Wii mini Consoles
Below are the instructions on how to sync the Wii Remote or Wii Remote Plus to the Wii console.

What to Do:

  1. Press the Power button on the Wii console to turn it on.
  2. Open the SD Card Slot cover on the front of the Wii console. If you are using a Wii mini, the sync button is located on the left hand side next to the battery compartment. The sync button is a darker shade of red than the console.
  3. Remove the battery cover on the back of the Wii Remote or Wii Remote Plus to be synced.
  4. Press and release the SYNC button just below the batteries on the Wii Remote; the Player LED on the front of the Wii Remote start to blink. While the lights are still blinking, quickly press and release the red SYNC button on the Wii console.
  5. When the Player LED blinking stops and stays lit, the syncing is complete. The LED that is illuminated indicates the player number (1 through 4).
  6. This sync procedure must be followed for each additional Wii Remote added to the system.

Notes:

  • Only a Wii Remote in Standard Mode (After Synced) can turn the power ON or OFF of the Wii console .
  • This procedure may not work for extra remotes while your wii console is in certain applications. Be sure to exit all applications if you notice that a sync is unsuccessful.

Video:

How to sync / connect your Wired / Wireless xbox 360 controller to the console

How to sync / connect your Wired / Wireless xbox 360 controller to the console

 Applies to:  Xbox 360 Consoles (Slim or Old versions)

Learn how to connect a wireless or wired controller to your Xbox 360 console.

Connect a wireless Xbox controller

  1. Turn on your console.
  2. Press and hold the Guide button on the controller until it turns on.
  1. Press and release the connect button on the console.
For Xbox 360 E console
For Xbox 360 S consoleFor Original Xbox 360 console
  1. Wait 20 seconds, press and release the connect button on the controller.
  1. The lights around the console's power button will stop flashing once the controller connects to the console.
On the Xbox 360 S console, when controllers are connected, they have one of four positions. Each position appears as a lighted section around the console power button and the controller Guide button.
On the 360 E console, a solid green light on the front of the console shows that the controller is connected. To see the player position, look at the ring of light around the Guide button on your controller. It will indicate one of the four position.
If the controller doesn't turn on, check the batteries in the batteries compartment. Insert fresh/new AA batteries into the battery case and make sure you place them correctly.
To connect more controllers, follow these steps again. You can connect up to four controllers. Each connected controller appears as a lighted section around the console’s power button and around the Guide button in the middle of each controller.
  • To disconnect a wireless controller, press and hold the Guide button for about three seconds, and then choose to turn the controller off on your TV Screen.
  • If you choose to turn off the console, the controller will reconnect the next time you turn on the console.
  • The controller can be connected to one console at a time. You can connect the controller to a different console, but the controller will lose the connection to the previously connected console.

Connect a wired Xbox controller

Plug the Xbox 360 Wired Controller into the USB ports on the front of the Xbox 360 console. To disconnect the controller, pull on the connector, not the cable.
The cable on the Xbox 360 Wired Controller features an inline release. If someone pulls the cable, the inline release reduces the chance of the Xbox 360 console falling.

Wireless controller troubleshooting

If your wireless controller doesn't turn on, or if it loses power, try the following solutions:
Solution 1: Replace the batteries
Insert a new set of AA alkaline batteries into the Xbox 360 Wireless Controller, and then try to turn it on.
Solution 2: Try a different battery pack
If you have another Xbox 360 Wireless Controller, take the battery pack from that controller and attach it to your controller. Then, try turning on your controller. If it works with the different battery pack, your original battery pack might be defective. If your controller is under warranty, you can order a replacement battery pack from Xbox Support. For more information, see the Contact Us section at the bottom of this page.
If your controller is out of warranty, you can buy a new battery pack from a retail store.