Showing posts with label products. Show all posts

Friday, June 10, 2016

How to upgrade your i-FlashDeviceHD Flash Drive

written by althemax.com

: www.althemax.com

How to upgrade your i-FlashDeviceHD Flash Drive


Introductions
● Please directly inserted into the computer, don't use ‘USB
Extension Cable USB’ or ‘USB HUB’
● Computer hardware environment(电脑硬件环境)
CPU: More than 2.0G
Memory: More than 1GB
Hard disk: 80G
Support system: Windows 2k/xp/vista/7 and 32bit
Operating steps

1.Open the software(打开软件)
1> Right Click and Open as admin (双击如下图标)
A Tool - firmware upgrade for i-flash device
2> Software interface(软件界面)
A Tool software interference - iflash device upgrade
2.Insert ‘Flash Drive’ to PC and Select Tool (插入 盘并选择工具)
1> Correct, next step(工具选择正确,进行下一步操作) ;
A Tool software interference - iflash device upgrade
2> According to the prompt replacement tool and Start operation, pull out flash drive, back to step 1(根据提示更换工具,拔出 盘,回到第一步重新开始操作) ;
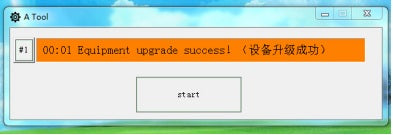
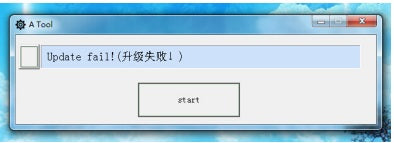
3.If the device has already, Click “start” (如果设备已就绪,点击“ start” )
1> Complete upgrade, pull out flash drive(完成升级,拔出 盘);
A Tool software interference - iflash device upgrade
2> Update failed, Start operation, pull out flash drive, back to step1(升级失败,拔出 U盘,回到第一步重新开始操作);
A Tool software interference - iflash device upgrade
3> If there are other anomalies, pull out flash drive, back to step1(如果出现其他异常情况,
拔出 盘,回到第一步重新开始操作);

4.If update success.Please Off the tools,let ‘flash drive’ run in PC twice,To
ensure that the upgrade is complete!(升级成功后,请关掉升级软件在 PC 上运
行两次,以确保升级完成!

Q&A:
Q: Insert the computer, prompted ‘unknown file’ or ‘virus’?
插入电脑后,出现提示不明文件或者是病毒?
A: Close the firewall (such as anti-virus software).关闭防火墙(杀毒软件等软件)
Q: Open the wrong or can't open?(打开出错或者无法打开?)
A: The identity of the need to use the administrator to open the tool.(需要用管理员的身份打开工具。)
Q: Click "start" no response?多次单击‘ start’无反应?
A: Pull out ‘FlashDrive’ and close the tool, back to step1;Or, insert another USB interface;Or, In another computer. 拔出 盘并关闭工具,回到第一步重新操作;或者换另外一个 USB 接口再操作;或者更换一台电脑再操作
Q:‘ Update fail(升级失败)!’?
A: Pull out ‘FlashDrive’ and close the tool, back to step1;Or, insert another USB interface;Or, In another computer.
拔出 盘并关闭工具,回到第一步重新操作;或者换另外一个 USB 接口再操作;或者更换一台电脑再操作
Q: repeated 'Update fail and fail (upgrade)!'?反复出现‘ Update fail(升级失败)!’?
A: Pull out ‘FlashDrive’ and close the tool, back to step1;Or, insert another USB interface;Or, In another computer.
拔出 盘并关闭工具,回到第一步重新操作;或者换另外一个 USB 接口再操作;或者更换一台电脑再操作

Tuesday, August 18, 2015

How to Sync Wii Remote with Wii / Wii Mini Console

written by althemax.com

Related Products: Wii Remotes, Wii Remote Plus 

Applies to:  Wii, Wii mini Consoles
Below are the instructions on how to sync the Wii Remote or Wii Remote Plus to the Wii console.

What to Do:

  1. Press the Power button on the Wii console to turn it on.
  2. Open the SD Card Slot cover on the front of the Wii console. If you are using a Wii mini, the sync button is located on the left hand side next to the battery compartment. The sync button is a darker shade of red than the console.
  3. Remove the battery cover on the back of the Wii Remote or Wii Remote Plus to be synced.
  4. Press and release the SYNC button just below the batteries on the Wii Remote; the Player LED on the front of the Wii Remote start to blink. While the lights are still blinking, quickly press and release the red SYNC button on the Wii console.
  5. When the Player LED blinking stops and stays lit, the syncing is complete. The LED that is illuminated indicates the player number (1 through 4).
  6. This sync procedure must be followed for each additional Wii Remote added to the system.

Notes:

  • Only a Wii Remote in Standard Mode (After Synced) can turn the power ON or OFF of the Wii console .
  • This procedure may not work for extra remotes while your wii console is in certain applications. Be sure to exit all applications if you notice that a sync is unsuccessful.

Video:

Saturday, August 8, 2015

New Wired 3.5mm With Sponge Anti Slip Remote Extendable Shutter Selfie Monopod Stick Multi Color - Black


Ships to Worldwide USD 6.44

Overview :
This product is a great assistant to help you take photos of yourself by yourself or take pictures with your friends and family. Wired Bluetooth Selfie Stick Monopod with built-in with Remote Control Shutter, and no additional shutter needed. Don't need to charge Snap away. Take the line without charge, Just plug it into audio port, You will like it! (Optional: Also works with Camera 360 App, available on Apple App Store & Google play)

Features:
- 100% brand new and high quality
- SELFIE Extendable Monopod with 3.5mm Jack Cable and Remote Button for IOS & Android system.
- Non-slip soft foam handle
- Quick spin knob for fast and secure mounting
- Connects to tripod mount on camera
- Adapter rotates 180-degrees
- Unique ball-head for easy adjustment to any angle
- Lightweight, portable, easy to carry
- Newest? No Battery Needed, No Bluetooth Pair Needed, Apps Free, Wi-Fi Free.
- About 98cm 39 inch Extendable handheld selfie stick for iPhone, Samsung, Sony, LG and other popular brand smartphones.
- Allow you to take steadier and sharper pictures and videos by avoiding shakes and vibration when holding your device running iOS 5.0 + Andriod 4.2.2+.
- This Monopod can be extended to 90cm, with adjustable phone holder clamp and thumb screw of monopod locks for multiple angle shooting with 180 degree position. Adjustable phone holder fits all phones width between 5.6-8.5 cm.
- Built-in shutter button designed for easy to tack continuous shooting and capture any moment.

Specifications:
- Material : Aluminum alloy
- Size of product : 5 segment
- Extends to 90cm
- Closes to 20cm
- Clip size: 5.5 - 7.5 cm
- Jack: 3.5mm audio plug

IOS/Anderoid take line directions for use:
- For IOS series products, do not need to install any software can be used, with take line, open the camera can take pictures. Suitable model with (note: use be at least iOS5.0 version): iPhone 3GS/4/4S/5/5C/5S/6/6 Plus, iPad 2/3/4 Air Mini (iOS 5.1 or above), etc.
- For Android mobile phone, because the Android system for open systems, each brand can be modified according to its own ideas of mobile phone function, formulation, no unified standard, and even the same brand of different versions of the system design, the configuration is different also, so part of the mobile phone cannot be used directly, you need to install a similar 360 camera APP to use. For such as: Samsung Note 2/3 S4, GT-19128E system version a new configuration such as high mobile phone, do not need to install the APP, but need to change my camera Settings, the GT-19128E, for example, other brands or models of mobile phone, please According to the following instructions, combined with the actual situation of mobile phone set.
1) Open the camera, click on the gear shape icon set into the interface.
2) Continue to click on the icon in the top right corner of the gear from into the next layer menu.
3) Continue to click on the icon on the right side of the gear shape layer to the next menu.
4) Click on "camera key...zoom key" to enter layer in the options menu.
5) Choose "camera button", exit set state can take line by remote control to use pictures.
** Product is equipped with a switch, pull before use, please according to the mobile phone system, will switch to correspond to the phone's working mode.**

Package includes:
- Wired Handheld Monopod Stick with 3.5mm Jack Cable - Black X1
- Phone Holder  X1


Add caption